A felt pennant is a simple object, which is exactly why the details decide whether yours looks sharp or homemade. Match the size, the felt, and the decoration method to how the pennant will actually be used, and a small piece of fabric carries a surprising amount of pride. Miss on one of those and you end up with letters that peel, a shape that looks stubby on a wall, or artwork that never reproduces the way it did on screen. This walkthrough goes through the decisions in the order a printer will ask about them, so you can spec a pennant that comes back right the first time.
Start with the size, because everything follows from it
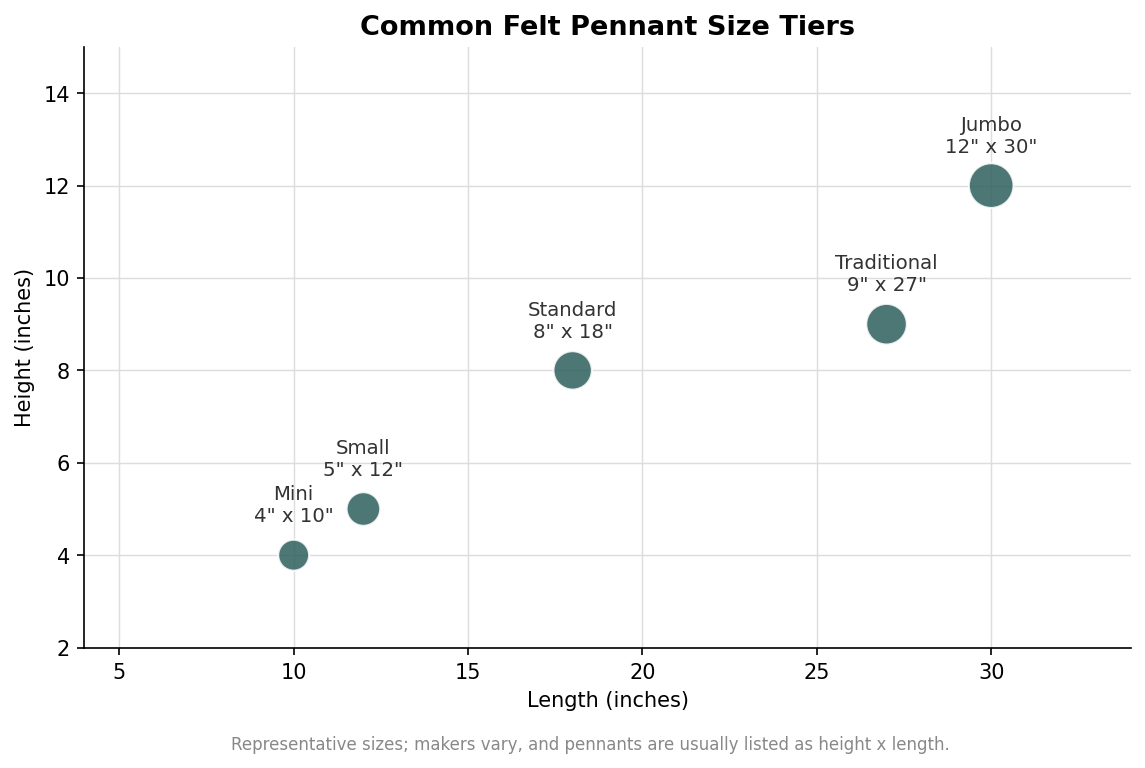
Felt pennants are usually described as height by length, and they cluster into a handful of common tiers. Mini pennants around 4 by 10 inches are the giveaway size, the thing you hand out at a game or clip to a backpack. A small pennant near 5 by 12 inches is still pocketable but has more room for a name. The workhorse standard sits around 8 by 18 inches, big enough to read across a room and the default for most team and school orders. Traditional college pennants run longer and leaner, in the neighborhood of 9 by 27 inches, which is the classic dorm-wall silhouette. Jumbo pennants of roughly 12 by 30 inches and up are display pieces for a gym wall or a reunion backdrop.
Pick the size by the job, not by the price. A pennant meant to be mailed as a keepsake wants to be small and light; one meant to hang behind a podium wants length so the shape reads from a distance. If you are unsure, the standard 8 by 18 is the safe middle that photographs well and still ships cheaply.
Wool felt or acrylic felt
Nearly every custom pennant is cut from one of two materials. Wool felt is the traditional choice, with a dense, slightly textured surface and a heritage look that suits alumni pieces and vintage styling; it is the premium option and priced accordingly. Acrylic or poly felt is the everyday workhorse: it is more affordable, comes in a wider and more consistent range of bright colors, resists fading, and holds up well for giveaways and large runs. For a fundraiser handing out hundreds of pennants, acrylic felt keeps the unit cost sane; for a limited alumni edition meant to last on a wall for decades, wool earns its premium. Neither is wrong, but the choice sets both the tone and the budget, so make it early.
The decoration method shapes your artwork
How the design goes onto the felt matters as much as the design itself, because each method wants a different kind of art. Die-cut felt applique, where letters and shapes are cut from contrasting felt and sewn or heat-bonded on, gives the raised, tactile, old-school varsity look; it is ideal for bold letters and simple shapes but a poor fit for fine detail or gradients. Embroidery adds a stitched, dimensional finish that reads as high quality on names and crests, though large solid areas get expensive in thread. Screen printing lays flat ink onto the felt and is the economical route for high volumes with a limited number of spot colors, which makes it the common choice for giveaway runs. Dye-sublimation prints full color into the fabric and is the method to reach for when a design has photographs, gradients, or many colors, since it reproduces artwork the other methods simply cannot.
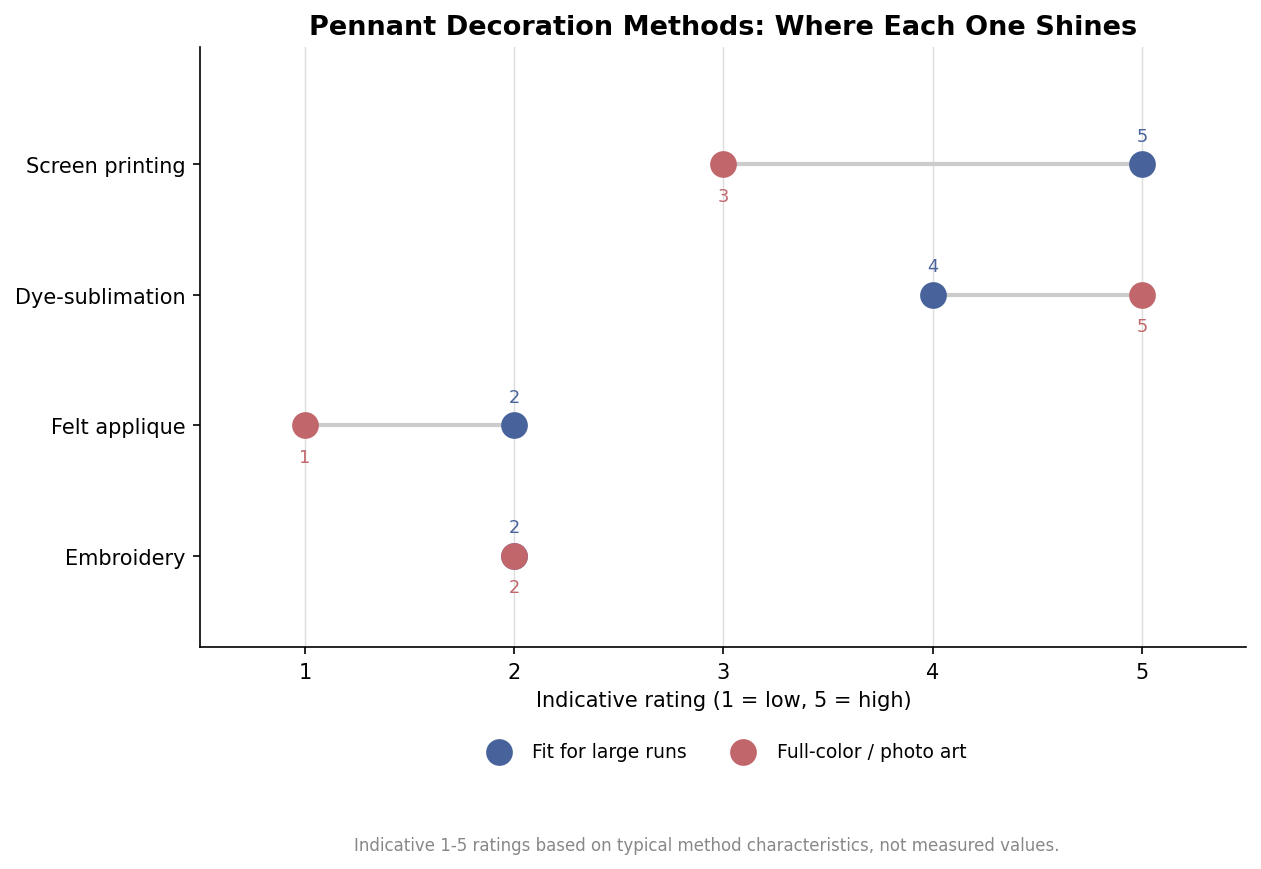
The practical takeaway is to decide the method before you finalize the art. A logo with four flat colors and chunky letters is happy as a screen print or an applique; a full-color crest with shading needs sublimation. Trying to force a detailed, multicolor design into an applique will only frustrate everyone involved.
Finishing turns a shape into a pennant
A few small finishing choices give a pennant its character. The wide edge can be cut straight or pinked, the zigzag cut, for a classic look. A contrasting header strip sewn across the wide end is the traditional home for a secondary line of text or a year. Tassels or streamers at the point add movement and a spirited, retro feel. You will also decide how it mounts: a slot or sewn sleeve for a wooden stick makes a hand-wave pennant, while a plain header with a sewn loop is meant to hang. Finally, choose single or double-sided. Single-sided is standard and economical, while double-sided costs more but matters when the pennant will be seen from both directions, as it is when hung in the middle of an open space.
Getting the artwork print-ready
Whatever method you choose, clean art saves time and money. Supply logos as vector files so they scale to any size without softening, and spell out your exact colors, ideally as Pantone references, so the felt and ink match what you expect rather than a monitor’s guess. Keep text large and high-contrast; on a mini pennant, thin letters and small taglines simply disappear, so a good rule is to design for the smallest size in the order. Ask the printer for a proof and, on larger runs, a physical sample before the full production run, because felt color and print density look different in hand than on a screen.
Two last logistics are worth nailing down in writing: the minimum order quantity and the lead time. Custom pennants generally get cheaper per piece as the quantity climbs, and retail pricing across sizes and methods can span from a few dollars for a plain mini to several hundred for a large, heavily embroidered display piece, so a per-unit number only means something alongside a quantity. Lead times run longer for embroidery and applique than for a simple screen print, and rush timelines usually exist but cost more, so confirm both before you approve art. Exact minimums, prices, and turnaround vary from one maker to the next, so treat any single figure as a starting point and get your own quote in writing.